www.lighttoolsupply.com

Thursday, March 31, 2011

PRO3600 and PRO360 Digital Protractor

http://www.lighttoolsupply.com/PRO3600

#Digital #Protractors

The PRO 360 and PRO 3600 are high performance, angle measurement tools that are sold exclusively through our network of industrial distributors. Both units have a One Year Limited Warranty, CE Certification and National Stock Numbers.* These state-of-the-art, angle measurement tools have features such as "Hold" which lets you to store the last reading taken with a touch of a button. They also have "Alternate Reference" (Alt Zero) which allows you to electronically zero the reading anywhere within the protractor's 360° range. The PRO 3600, in addition to higher resolution (0.01°), has an RS-232 port so you can output the angle measurement data to a computer. Both protractors can be easily fitted with an available, magnetic base or an array of custom attachments.

Applications include:
  • Automotive
    • Driveline Measurement
    • Racecar wing & chassis adjustment
    • Wheel alignment
    • Frame straightening
  • Aerospace
    • Control surface rigging
    • Prop adjustment
    • Fire control elevation
    • Rotor angle measurement
    • Aircraft leveling
  • Industrial
    • Machine tool set up
    • Lathe and mill alignment
    • Quality Assurance verification
  • Medical
    • Range of motion measurement
* The National Stock Number (NSN) for the PRO 360 is #5220012512120 and the PRO 3600 is #5210014180671.


PRO 3600

  • Full 360 degree range (90° x 4).
  • Easy to read LCD display.
  • Maximum accuracy of +/- 0.05° and maximum resolution of 0.01°
  • Precision, machined aluminum frame.
  • Unit can be recalibrated to factory accuracy in the field without special tools or fixtures.
  • RS-232 compatible interface for computer data collection.
The PRO 3600 Digital Protractor from SmartTool Technologies is a revolutionary measuring tool that provides an immediate, digital reading of all angles in a 360? range. The unit utilizes a patented, liquid-filled sensor combined with precision measurement circuitry to provide unparalleled accuracy and stability.
A precision machined aluminum frame provides a rigid, lightweight, ultra-precise platform for extremely accurate measurements. The frame is grooved along the bottom surface to facilitate use with round objects such as pipes or shafts and incorporates threaded holes on the bottom for rigid attachment if desired.
The front panel buttons can be used to capture desired readings or to designate an alternate reference surface from which subsequent angles are then measured. The unit can also be easily recalibrated in the field to factory accuracy using any available flat surface.
The PRO 3600 features an RS-232 compatible serial interface for transmission of angle measurement data to a computer or other equipment. The unit operates for up to 500 hours on a single 9V battery, incorporates an automatic power down feature, and ships standard with a rigid plastic case.
Additional information about interfacing to the PRO 3600 Digital Protractor is available in Application Note AN-202: Interfacing to a PRO 3600 Digital Protractor


PRO 360

  • Full 360 degree range (90° x 4)
  • Easy to read LCD display which intelligently flips over when the unit is upside down.
  • Maximum accuracy of +/- 0.1° and maximum resolution of 0. 1°
  • Precision, machined aluminum frame.
  • Unit can be recalibrated to factory accuracy in the field without special tools or fixtures.
The PRO 360 Digital Protractor from SmartTool Technologies is a revolutionary measuring tool that provides an immediate, digital reading of all angles in a 360° range. The unit utilizes a patented, liquid-filled sensor combined with precision measurement circuitry to provide unparalleled accuracy and stability.
A precision machined aluminum frame provides a rigid, lightweight, ultra-precise platform for extremely accurate measurements. The frame is grooved along the bottom surface to facilitate use with round objects such as pipes or shafts and incorporates threaded holes on the bottom for rigid attachment if desired.
The front panel buttons can be used to capture desired readings or to designate an alternate reference surface from which subsequent angles are then measured. The unit can also be easily recalibrated in the field to factory accuracy using any available flat surface.
The unit operates for up to 500 hours on a single 9V battery, incorporates an automatic power down feature, and ships standard with a rigid plastic case.
Typical applications include:
  • Drive shaft alignment
  • Aircraft flap calibration
  • Setup of precision machines
  • Road or rail-track layout
  • Satellite or aerial alignment

Gaging Tips


Order Mahr Federal at Light Tool Supply  http://www.lighttoolsupply.com/Mahr


Gage Accuracy Runs Hot and Cold
George Schuetz, Mahr Federal Inc.

"It takes a while to warm up in the morning, but after that, it runs great." I swear I've heard machinists say this of their gages, as if those instruments were like car engines with 50-weight motor oil and cold intake manifolds.
What's really happening, of course, is that the machinist arrives at work, takes his gage and master out of a controlled environment, masters the gage and then gets to work. As he handles it, the gage begins to warm up—which is not to say that its moving parts move more freely, but instead, that the gage itself expands. Depending on where he keeps his master, and whether or not he re-masters regularly, he will find himself "chasing the reading," possibly for hours, until everything reaches equilibrium.
Thermal effects are among the most pervasive sources of gaging error. Dirt, as a gaging problem, is either there, or it isn't. But everything has a temperature—even properly calibrated gages and masters. The problem arises from the fact that everything else has a temperature too, including the air in the room, the workpiece, the electric lighting overhead, and the operator's fingers. Any one of these "environmental" factors can influence the reading.
Why is temperature such a critical concern? Because most materials expand with heat, and they do so at differing rates. For every 10˚F rise in temperature, an inch of steel expands by 60 millionths. "Not to worry," you might say, "I am only working to 'tenths'." But aluminum expands at more than twice that rate, and tungsten carbide at about half. Now, what happens to your reading if you are trying to measure a 2-inch aluminum workpiece with a steel-framed snap gage and tungsten carbide contacts, after the workshop has just warmed up by 7 degrees? And by the way, did that workpiece just come off the machine, and how hot is it?
Beats me, too. That's why it's critical to keep the gage, the master, and the workpiece all at the same temperature, and take pains to keep them there.
That means keeping an eye on many factors. Don't put your master away like some sacred object. Gage and master must be kept together, to ensure that they "grow" in tandem and to permit frequent re-mastering. Workpieces must have sufficient time to reach ambient temperature after machining, or after being moved from room to room. The operator should avoid handling the gage, master and workpiece more than absolutely necessary.
Care must be taken that sources of heat and cold in the room do not intrude on the process. Incandescent lighting, heat and air conditioner ducts, even a shaft of direct sunlight through a window can alter a whole series of measurements. Keep things at the same "altitude" in the room, to avoid the effects of temperature stratification.
As tolerances tighten, additional measures become necessary. Workpieces should be staged on a heat sink beside the gage and should be handled with forceps or gloves. A Plexiglas shield may be required to protect the gage from the operator's breath. (The heat, that is, not the effects of the sardine sandwich he had for lunch.)
For accurate gaging, be aware of possible sources of thermal "contamination" to the measurement process. While it may not be possible to isolate your gaging process in its own perfectly controlled environment, at least take precautions to minimize the effects of temperature variation on your gages, masters and workpieces.
Thermal sources of error are a major cause of gage performance degradation. Typical thermal sources are: (1) radiant heat from illuminating sources; (2) conductive heat (e.g. operator touching workpiece); (3) convection and drafts from heating and cooling systems; and (4) room temperature gradients.

Tuesday, March 22, 2011

#Burr #King Manufacturing - Providing quality finishing products since 1951

Order at http://www.lighttoolsupply.com/burrking


QUALITY FIRST AND LAST

For over fifty years Burr King has manufactured quality abrasive belt grinders, polishing equipment, disc grinders and vibratory deburring and polishing equipment.
All of our products are designed in America and manufactured in Warsaw, Missouri.
Our products use innovative designs of uncompromising quality, they are industrial grade, intended for use on metals, woods, composites, plastics, rubber, stone, fiberglass and other materials. Burr King products are simple-to-use, no nonsense tools preferred by professionals.


Celebrating 60 Years in 2011!

60th Anniversary

Burr King Manufacturing - Providing quality finishing products since 1951

Broad Product Line

For over 50 years Burr King grinders, polishers, and mass finishing systems have been used by the world's leading companies. Our products use innovative designs of uncompromising quality, they are industrial grade, intended for use on metals, woods, composites, plastics, rubber, stone, fiberglass and other materials. Burr King products are simple-to-use, no nonsense tools preferred by professionals.

Quality First and Last

Each Burr King machine, accessory, and consumable is rigorously tested for specification compliance throughout its manufacture. Should we deliver a product that does not function, or meet it's intended purpose we will correct the situation without quibbling - guaranteed!

Free Tests and Evaluations on Customer Parts

Parts may be sent to the Burr King factory for a full process test report. Customers will receive their processed parts back with a complete, easy to understand finishing recommendation that lists methods, materials, equipment and time variables. Burr King customers can make informed, low risk buying decisions.

Customer Site Product Trial

Many Burr King products can be brought directly to the customers plant for demonstration. Where this is not practical any Burr King machine can be delivered to the customer's work site for actual customer trial prior to purchase. Call the Burr King factory for information about this valuable program.

Ready and Competent Customer Service

Our factory personnel, and national product representatives are ready and prepared to assist customers with applications, service, repair, and/or special situations.

Mahr Federal introduces the NEW mMaxmm II Digital Indicator family.

http://www.lighttoolsupply.com/Mahr

http://www.mahrfederal.com/

Mahr Federal introduces the NEW mMaxmm II  Digital Indicator family.


The mMaxmm II is the second generation Digital Indicator built upon the mMaxmm and Maxum philosophy. It‘s a digital indicator built for the shop floor incorporating longer battery life, improved performance, and a unique absolute positioning digital transducer.

There are many improvements and new features that have been implemented to provide the best product at the best value with the most versatility available today.
The new mMaxmm II comes in three models:
·         mMaxmm II  STANDARD
·         mMaxmm II  ADVANCED
·         mMaxmm II XL
All mMaxmm II models include:
·         The same mMaxmm and Maxmm features in one simple to order unit. 16 part numbers replace the many combinations of the mMaxmm configured ordering number system.
·         User set up of all operational features
·         An easier to change and readily available battery that provides up to 2X longer battery life
·         Data output compatibility to MarConnect interfaces
·         10m“/0.2ยตm Resolution Selectable

mMaxmm II Advanced and mMaxmm II XL Models also include:
·         Dynamic Measurements, MIN, MAX, TIR, Hold
·         A unique 2 point difference/centerline feature to compare 2 actual size (non-comparative) measurements on-the-fly
·         Single or continuous data output with serial number identification output capability 


Order Electrix Lights at http://www.lighttoolsupply.com/electrix

Electrix, Inc. is an established architectural lighting fixture manufacturer located in New Haven, Connecticut - the gateway to New England, long recognized as a creative and architectural hub. We are a rapid response focused organization with a 45 year history of building well designed, over-engineered, lighting fixtures for architectural, task and industrial applications.

We design and manufacture specification grade Wall Sconces, Cove and Indirect lighting for the architectural lighting community and Task Lighting for Industrial and Business Product markets. We have the ability to build custom or OEM fixtures, modify standards and build you exactly what may be required to successfully complete a project.


Consistent service has earned us the trust and the opportunity to build strong, long term customer relationships. We take our product development direction by listening to our customers and business partners needs.


For 45 years, the name Electrix has been synonymous with quality lighting. We have been manufacturing lighting fixtures since 1962 and first became involved with architectural luminaires during the 1980's when we started building functional lighting as a part of architecture.

Our design features have always been influenced by the Scandinavian and European creative contributors of our in-house design staff. Over the years, Electrix has built a reputation for successfully collaborating with architects, designers, lighting consultants and engineers resulting in numerous quality lighting design solutions. 


Electrix is committed to fine Craftsmanship and
Customer Satisfaction.

Electrix products are designed, built and performance tested to the highest standards at our factory. From concept, to component and material selection, to production, our product quality and your project are our first priority. UL and CUL listings ensure electrical safety and adherence to codes.

Our team of sales professionals offers comprehensive product knowledge and application assistance. We work closely with our sales representatives and specifiers to ensure competitive pricing and timely product delivery. Electrix is committed to satisfying you, the specifier. Our product range is diverse and our broad custom capabilities help to meet your architectural lighting requirements.


Electrix is a fully integrated manufacturing facility. Our products are developed using state of the art CAD/CAM software and built in our manufacturing facilities in New Haven, CT. Superior design, engineering and manufacturing all contribute to building and manufacturing innovative lighting fixtures reflecting your style and design imagination. We welcome the opportunity to help develop your custom fixtures.

Shop Vac


 Order Shop Vacs at http://www.lighttoolsupply.com

Shop-Vac® Corporation is the recognized world leader in wet/dry vacuum cleaners. For more than 40 years, Shop-Vac® Corporation has manufactured innovative, high quality vacuum cleaners and accessories. Shop-Vac® Corporation offers the most complete line of vacuum cleaners and accessories available for consumer, industrial and commercial applications. Customers associate the Shop-Vac® brand with dependability and the ability to handle the toughest cleaning jobs.

Thursday, March 17, 2011

When Gaging Becomes Measuring That Becomes Gaging

Friday Night Fights.  Or, When Gaging Becomes Measuring That Becomes Gaging
George Schuetz, Mahr Federal Inc.

                                                            http://www.lighttoolsupply.com
Many articles ago we discussed the terms "gaging" and "measuring," which are often used interchangeability. There are times when gaging is appropriate and others when measuring is the best way to go. Measuring is a direct reading process in which the inspection instrument consists of (or incorporates) a continuous series of linear measurement units, commonly known as a scale. These usually start at zero and go up to the maximum range of the instrument. The workpiece is directly compared against this scale and the user counts the units, or the measuring instrument displays the amount of movement indicated by the scale. Examples of measuring instruments include steel rules or scales, calipers, micrometers, height gages or CMM's.
Measuring instruments tend to be more versatile, though a little less accurate than gaging instruments. They are often used for incoming inspection, or in a machine shop where volumes are low and high precision is not a requirement.
Gages, on the other hand, are indirect reading instruments. The measurement units live not on the scale but off-site (in a calibration room somewhere), and a master or other standard object acts as their substitute. The workpiece is compared against the master and only indirectly against the measurement units. The gage thus evaluates not the dimension itself, but the difference between the mastered dimension and the workpiece dimension. Examples of these comparative gages include an adjustable bore gage, mechanical snap gages, or bench stands with dial indicators.
Gages tend to be faster and more accurate than measuring instruments. This is because they are dedicated to a particular size, and over their short range, produce higher resolution and hence, greater accuracy.
With many of today's electronic gages, the line between gage and measuring instrument is becoming blurred. It comes down to the definition of what constitutes a long measuring range as opposed to a comparative measurement. Is a one-inch digital indicator on a bench stand, referenced on the measurement surface, a gage or a measuring instrument? These are the kinds of discussions that can go on for hours in a pub full of gage engineers on a Friday night.
But there are situations where you can make a measuring instrument into a gaging instrument to improve its performance. For example, most calipers and their big brothers, the height gages, use electronic scales as internal masters. The electronic scale is what the device compares the size of the part to. With the addition of a little computing power, these scales can be "mapped:" that is, their imperfections determined and correction factors added to improve performance.
Often you will see the performance of such an instrument defined as "2 + L/600," where the basic units are in micrometers, and the L is in millimeters. What this means is that there is a basic error in the system of 2 ยตm, plus an additional error based on the length of travel. Thus, if the scale is moved to its full length—which is when L is 600 mm—then the error becomes 2 + 1 or 3 ยตm.
If you want to get rid of this additional 1 ยตm, you can use the height gage as a comparative gage. Height gages are usually referenced at "0" on the granite surface plate on which they sit, and all measurements are made with regard to this surface. The way to improve performance is to limit the amount of travel seen by the scale by using a gage block or other master to set a new reference point above the granite surface. For example, if you want more accuracy at 200 mm above the granite surface, use a 200 mm gage block to set a new reference point and make your measurements in comparison to the 200 mm set point.
So now we have another bar argument beginning to brew. Is my height gage a measuring instrument or a gaging instrument?
Whatever it is, we have improved the performance of the height gage by getting rid of the travel error. And this technique is not just limited to length performance of a measuring instrument: squareness error can also be improved by mastering on a reference square that is better than the inherent spec built into the gage.
Regardless of whether you are measuring or gaging, performance is almost always improved by shortening the measuring range.

Tuesday, March 15, 2011

The Fred V. Fowler Company

Order Fowler Tools at Light Tool Supply http://www.lighttoolsupply.com


Fowler Company Profile
INDUSTRY SERVED
The Fred V. Fowler Company is globally recognized as one of today's leading suppliers of quality control and inspection equipment.
Founded in 1946, we have dedicated our 62 year history to supplying the most innovative measuring products possible.
INNOVATION IN MEASURING
As industry moves more in the direction of computer-aided manufacturing, Fowler continues to introduce important new tools designed to lead the way in inspection and measuring. Familiar items—including calipers, micrometers, indicators, height gages and bore gages — have been redesigned and now feature state of the art electronics to ensure compatibility with the latest in computer integrated manufacturing and statistical process control (SPC).
CUSTOMER FOCUSED
In order to reliably meet customer expectations, Fowler's technical sales team is in the field. We are customer focused and customer driven. "Downsized" American manufacturing is time poor and demand rich. Manufacturers increasingly rely on their key supply chain partners to make critical product decisions.
At Fowler, we are absolutely committed to providing our customers total support. What Fowler brings to a customer is a partnership in the ability to satisfy your requirements in terms of quality, cost and service.
AFTER SALES SUPPORT
Using a team approach, we will demonstrate to your you that working harder with fewer people does not have to mean that quality is in any way comprimised...on the contrary, quality is the key to sustained growth in a downsized manufacturing environment.
Sales support should never start and stop with an introductory sales meeting. Fowler sales support means a different approach to our customers needs. We have direct field support, and a full staff of technical and knowlegable personnel ready to help you.
PRODUCT SUPPORT
Your customers want it now: service support and stock availability are the name of the game. Well, as a supplier of instruments we back that up.
Fowler ships 95% of all orders every day. We have an extensive inventory and a fast and professional service department backed by the industry's best warranty program.
QUALITY
Quality is our passion. Quality in management, quality in sales, service and support and most of all, quality in products sold.
Let's face it, ultimately you choose instrument providers based on what they can bring to the table. When you own Fowler products, you own value, solid experience, innovation, a get-it-done spirit and the best precision instruments in the world.

HISTORY
The Fred V. Fowler Company incorporated in 1946, has grown nationwide and across North America to include
offices in Boston, Chicago and Ontario, Canada. Fowler is also now available in Mexico, with four regional locations. By exclusively distributing products manufactured by world leaders in measuring, Fowler has become a major force in the field of precision electronic tools.
Each of our offices have demonstration centers to familiarize our customers with our products. In addition, our national network of select distributors are well-trained, stocked and ready to help you with your measuring needs.
PRODUCT LINE
The Fowler Company's product line includes precision tools, electronic measuring instruments, optical measuring instruments, gage calibration equipment, and hardness testers.
With an emphasis on "user-friendly" electronics, we offer primarily industry standard RS232 output for data collection and SPC (Statistical Process Control), not some proprietary signal requiring additional interfaces. We even offer several leading software packages, including " SPC Express", and "Software Wedge".
As always, we continue to offer our popular lines of non-electronic tools, including high-quality micrometers, vernier and dial calipers, dial and test indicators, rules, gage blocks, stands, magnetic bases, squares, parallels and hundreds of other fine measuring tools essential to industry.

Our most heartfelt sympathy for the people of Japan

As we all know Mitutoyo is based in Japan and we all feel terrible about the Earthquake.
We have a long relationship with Mitutoyo and pray that they recover from this disaster.  They are in our thoughts and prayers.
Light Tool Supply.

Donations can be made to the Red Cross https://american.redcross.org/


We wish to express our most heartfelt sympathy for the people of Japan who have sustained tremendous damage and loss of life due to the March 11, 2011 earthquake and tsunami. We would also like to thank our business partners who have contacted us to express their concerns and sympathy. Currently, Mitutoyo Corporation has dispatched teams to study what damage has occurred to its facilities and what effects that damage will have on production. As well, Mitutoyo must make contact with key suppliers and service providers to determine what the effect will be on its supply chain. Given the state of continued crisis in affected areas of the country, getting this type of information is expected to take some time. One thing that we do know for sure is that our headquarters located near Tokyo and our Utsunomiya plants are on a half day schedule due to electricity rationing in those cities. This situation is expected to continue through the end of April. We will continue to share information with our business partners as it becomes known to us.
Mitutoyo America Corporation- 3/15/2011

#Baileigh Industrial #HP-160 Manual Hole Punch Press

Manually Operated Hand Punch HP-160

Order here
http://www.lighttoolsupply.com/baileigh


Specifications
Max Punching Capacity .314"
Throat Depth 6.25"
Power Manual
Shipping Dimensions (L/W/H)
20.5” / 9” / 36.5”
Shipping Weight
176 lbs

Manually Operated Hand Punch. 315" Mild Steel Maximum Capacity. 6-1/4" Throat Depth. Includes Round Punches and Dies for 1/8", 3/16", 1/4", 5/16",3/8", 7/16", 1/2", 9/16", and 5/8".

Baileigh Industrial offers tube and pipe benders, tube and pipe notchers, roll benders, band saws, sheet metal brakes, ironworkers, cold saws, press brakes and more. We are pleased to offer you quality metal working machinery and sheet metal equipment throughout Canada, Mexico and the United States, as well as Eastern and Western Europe. Below is a small overview of our metal fabrication equipment Baileigh Industrial has to offer.

Baileigh Industrial, Inc. has recently opened a new showroom / warehouse facility in Southern California.

Milwaukee Tool Heavy Duty. Fight Trip Sweepstakes.


https://www.milwaukeecain.com/

Join Cain Velasquez and Milwaukee Tool for a Heavy Duty Fight! Enter now for your chance to win a trip for two to a fight in the Continental U.S. and the chance to meet Cain Velasquez, or be one of five First Prize winners to receive a custom Milwaukee Tool Cain Velasquez Prize Pack!

Complete the form below to enter for a chance to win!
https://www.milwaukeecain.com/


Also fill out form and receive
Free Music Download. Take You Down.

You're listening to "Take You Down" – get a free download of this song by signing-up for Milwaukee's Heavy Duty e-newsletter! You'll get the latest information on contests, rebates, tool tips and tool testimonials. Song download will be available upon submission of the sweepstakes form.
Yes, I would like to receive Milwaukee's Heavy Duty Newsletter via E-mail and get a free copy of "Take You Down."

Thursday, March 10, 2011

#Light Tool Supply is proud to be a member of #Manta

#Mitutoyo - A History of #Metrology Leadership

Order Mitutoyo here http://www.lighttoolsupply.com/catalog/Mitutoyo

Mitutoyo   

History
Mitutoyo - A History of Metrology Leadership
The world's largest metrology company was founded in 1934 by Yehan Numata with one product - the micrometer. Mitutoyo's philosophy at that time was to make the best mechanical micrometer in the world. But also to produce them in quantities that made them affordable and available to all of manufacturing so they could improve the quality of the products they manufactured. This philosophy was expanded in the next several decades to include a wider product offering focused on mechanical, dimensional gaging products. Mitutoyo focused its R&D and production efforts on creating the most advanced micrometers, calipers, indicators and other measurement tools in the world.
As electronic technology became more widespread in the 70s, Mitutoyo applied electronics to its line of dimensional gaging equipment to include electronic, or digital, measuring tools. During this time it also began to offer larger, more complex and more sensitive measuring instruments, including optical comparators, form measuring equipment, and coordinate measuring machines. As statistical process control (SPC) was introduced, Mitutoyo led the world in the development of output gages, interfaces, data collectors and analysis software to take advantage of this new metrology science.
When the computer made its way into the field of metrology, Mitutoyo again shifted its focus to include this technology into its product offering and push measuring accuracies into the sub-micron range. Today, Mitutoyo presents its 6,000+ products as integrated, computer-based metrology systems, where they can be interconnected to form closed-loop-measuring networks.
Mitutoyo America Corporation was formed in 1963 and is headquartered in Aurora, Illinois (just outside of Chicago). Mitutoyo America offers the full product line of precision measuring tools, instruments and equipment with a distribution network, training and education classes, software development, and service support to provide a comprehensive metrology organization.
As the leading metrology company in the world, Mitutoyo is committed to future product development that applies breakthrough technologies to its full range of dimensional measurement tools, instruments and systems.
Dr. Yehan Numata is also the founder of the Buddhist Canon Translation Project.

Thursday, March 3, 2011

Light Tool Supply MORE THAN 40 YEARS EXPERIENCE Call to Order 1-800-985-3074

http://www.lighttoolsupply.com/
For as long as I can remember, I have been surrounded by tools. As a young boy I worked summers packing orders and unloading trucks at my father's tool and supply company. After graduating from college, I immediately went to work full-time for my father and have been in this industry ever since.  Over the years I have learned this business inside and out and have spent many hours using that knowledge to improve the mail order supply business. I have seen that business change drastically over the years. The most dramatic change is from a business based on the paper catalog to one based on products sold via the internet. Subsequently, after many years of experience, I decided to create my own company to do what I know best. Light Tool Supply is now quickly bringing tools to loyal customers at the best prices possible.  I encourage you to use our vast experience as a resource for all your tooling needs.  If you see something on our website that you do not feel is the best price, please feel free to email me directly at michael@lighttoolsupply.com.  I also would like you to email me or my staff with any manufacturer's Part# from our long list of vendors. Additionally, do not hesitate to contact Light Tool Supply with any of our competitors' part numbers. It would be my pleasure to cross reference those part numbers with ours and beat their prices! I realize there are many companies to choose from; I hope you will choose Light Tool Supply.


    Thank you,
     Michael Elson
     President
     Light Tool Supply


Michael Elson, President of Light Tool Supply working in machine shop. (Picture taken Maplewood NJ 1994)


Michael Elson, President of Light Tool Supply visits Mitutoyo Office in Germany (Picture taken in Germany 1994)


My Father, Gene Elson, current President and Founder of Penn Tool Co. Inc. (Picture taken Newark NJ 1967)


My Mother, Phyllis Elson, working at an Industry Trade Show 1972

Mahr Federal Inc. Gaging Tips- Gaging Those "Oddball" Applications

 shot

Gaging Those "Oddball" Applications
http://www.mahrfederal.com/

GAGING THE "ODDBALL" APPLICATION
George Schuetz, Mahr Federal Inc.
Virtually all metalworking shops need to measure holes, thicknesses, and heights.  Some shops, however, have to perform measurements that are more limited in application: some are industry or even company specific.

Oftentimes, manufacturers attempt to satisfy unusual gaging applications by designing and fabricating a gage in-house.  Most of the concepts of gage design are straightforward, and clever machinists can figure out how to apply these concepts in fairly basic fashion, usually by incorporating stock components such as indicators and gage heads, into custom-made fixtures.  Amateur gage design, however, may not be efficient.  It's often more cost effective to let gaging experts work out the details and spread design costs over a larger number of users.

Following are examples of gages developed for specialized applications.  There are two points to be made here: the first is that even the most obscure measurement tasks can usually be performed by relatively simple gages.  The second is that many gage makers are more than willing to work on "oddball" applications, freeing gage users to concentrate on their real business.

There are hundreds of thousands of countersunk rivet holes in the skin of a typical airliner.  To achieve maximum holding power and minimum wind resistance, the head of every rivet must sit flush with the outer surface of the skin.  However, government standards strictly limit the degree to which a manufacturer can grind down proud-standing rivet heads.  As countersink bits wear, countersink diameters and depths change.  Riveters need to measure the countersinks, in order to pick the right size rivet from an available selection range.

Countersink gages, operate like hand-held, plunger-type depth gages, with special-ratio dials or electronics, to convert vertical movement at the contact into diametric measurements.  The gage contact must be chosen to correspond with the included angle of the countersink.  Some gages measure the major, or entry diameter, while others measure the depth of the minor diameter (where the countersink meets the straight hole).  Although aerospace is currently the predominant application, other high-precision sheet metal industries have applications.

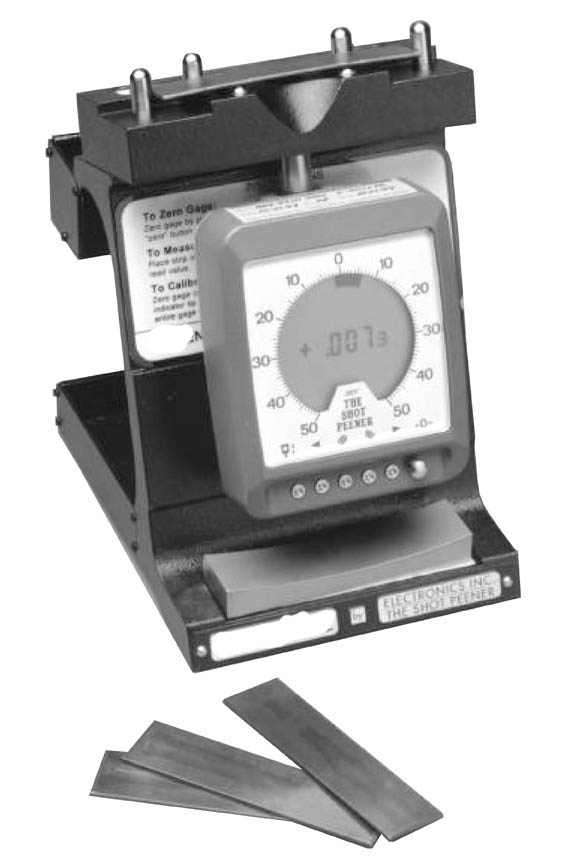
More exotic is a gage which is used to measure and control the results of the shot peening process.  Shot peening bombards a part with a stream of steel or glass particles, inducing sub-surface material compression and greatly reducing stress cracking under tensile loads.  Shot peening is widely used on automotive and compressor crankshafts and conrods.

To measure the process, a thin metal test strip is subjected to the shot stream.  The strip bends in a predictable manner, as a function of shot stream intensity.  An shot peen gage measures the radius of the strip.  Gage manufacturers have developed innovative mastering strategies to take both the longitudinal and transverse curvatures of the strip into account, and use refined mechanisms and geometries to hold and measure the strip without distortion.  Although the shot peen gage is essentially a bench top depth gage, it's these important details that make the gaging process quick and cost effective.
                          
Aerosol and beverage can manufacturers have highly specialized gaging requirements.   Tight tolerances must be maintained, both in order to ensure proper functioning of valves, seals, and pop-tops, and to save material: at production rates of several million units per day, a wall thickness variation of a few millionths quickly adds up to tons of aluminum.  There are more than a dozen critical dimensions on most cans, including such arcane features as crimp groove location, valve stem height, and "tab top bubble height."

In order for SPC to be effective when manufacturing cans the gaging results must work their way back to the manufacturing process in a timely manner as the cans go whizzing by.  Whole catalogs of can gages have been developed.  At the lower end of the technology spectrum are specialized indicator gages, which differ from generic gages mainly in the shapes of their reference surfaces and sensitive contacts.  Once again, the dimensions being measured here are simply variations on the basic themes of height, depth, thickness, ID, and OD.  But the theme can be elaborated almost infinitely, depending upon the need for precision, throughput, and electronic output.  Engineered fixture gages incorporating air jets and/or electronic gage heads can get the manufacturer halfway there, while fully automated systems with parts handling capabilities can ultimately make can gaging a hands-off, closed-loop process.

If the only concern is accuracy, then gage design can be pretty simple: laboratories achieve extremely good results with a dial indicator and a comparator stand.  Production applications, however, impose additional demands of throughput, ease of use, delivery, and maintenance and mastering intervals.  When it comes to cost effectiveness in specialized applications, it's the details that make the difference.

Fagor Automation reaches its highest record in export sales

See Light Tool Supply's selection of Fagor Products below http://www.lighttoolsupply.com/fagor


Fagor Automation reaches its highest record in export sales
Posted by World in General

Fagor Automation reaches its highest record in export sales getting close to its €70 Million of before the world crisis.
Fagor Automation will launch new projects in 2011 in the sales, industrial, innovation and international areas. Actions going from the launching of new products to the creation of technology for electrical vehicles and investments at their manufacturing plants in Mondragรณn and Usurbil (Spain).
Fagor Automation faces the year 2011 with the only unknown caused by the weakness of the European market. In the rest of the world it already showed a remarkable recovery in 2010 with a new record in exports: €58 million that represent a 63% annual growth.
Pedro Ruiz de Aguirre, Anton Sagasta, Koldo Berasategi
China was the main market representing 40% of their international sales and 35% growth; the USA with 60% growth and India where they grew sevenfold. Their greater penetration in this country as backed by the opening of their branch offices in New Delhi and Pune in 2010 adding to the one in Bangalore (2008) and they are planning to open a new subsidiary in Rajkot (Gujarat). This network is becoming almost as important as the one in the USA (6) and in China (5, including a manufacturing plant).
Although the Spanish market only reached 50% of its potential, the sales of the cooperative amounted to €66 million, getting close to the €70 million invoiced before the world crisis.
In order to maintain the rhythm of product innovation, Fagor Automation will dedicate more than 10% of its revenues to R&D, an area employing more than 80 people of its staff. The company has added projects backed by the Basque government, the Ministry of Industry and European institutions. The most recent one, Etorgai, will open their doors to diversity towards the electrical vehicle. The research will take place between 2010 and 2012 together with Fagor Ederlan, Cegasa, Ecenarro and Mondragon Automotive. Fagor Automation will work on creating a new electrical machine and a charger that will take advantage of the energy generated by an explosion (combustion) engine to load the battery and extend the autonomy of the vehicles beyond 300 km.
At the same time, in the machine-tool area, it participates in two projects having to do with machining on large machines: the Cenit Impeler, with Ibarmia, Correa, Juaristi and Ona; and the European Chameleon, with Soraluce and Goialde. Also, Fagor Automation is part of the Innpacto-Fore project with the Complutense University in Madrid to create large angular encoders, up to 2 meters that will facilitate the positioning of large machines or scientific facilities. They have also recently signed a three-year agreement  to promote R&D with the Automatics and Robotics Center in Madrid.
And last, the people in charge of the company have come up with an investment plan for €3 million for 2011. The funds will be destined to reinforce the machining capability of motors in Usurbil by incorporating boring mills and improve part finish quality and accuracy in the manufacturing plant of Arrasate-Mondragรณn by automating their processes which will require among other equipment, the installation of a special line of covering, automatic dosing machines and robots.

Tuesday, March 1, 2011

Baileigh Metal Fabrication Equipment


For the Lowest Prices Click Here http://www.lighttoolsupply.com/Baileigh

Baileigh Industrial - Quality Metal Fabrication Equipment

Baileigh Industrial, Inc. has consistently proven to be the leader of providing quality metal fabricating equipment to the respective industries in Canada, Mexico, The United States, and now Europe! Our product line has grown to include tube benders, pipe benders, mandrel benders, pipe notchers, hydraulic corner notchers, cold saws, band saws, sheet metal shears, sheet metal brakes, ironworkers, and much more. We have grown into one of the largest and well respected sources of metal fabricating and metal cutting machines in the Americas and Europe.
As an organization, Baileigh Industrial, Inc. prides itself with having friendly, knowledgeable sales engineers ready to assist your project needs. Our network of knowledgeable dealers in the metal fabricating industry offers local sales and support. Our goal is to provide profitable solutions for your fabricating needs.