www.lighttoolsupply.com

Thursday, March 28, 2013

Light Tool Supply

Light Tool Supply Announces Its Third Anniversary

Light Tool Supply is located in Maplewood, New Jersey and supplies industrial tooling and metalworking supplies online to customers all over the world. The family-owned business focuses its efforts on providing a wide range of inventory from many manufacturers at the lowest price possible.

  • Share on TwitterShare on FacebookShare on Google+Share on LinkedInEmail a friend
Maplewood, NJ (PRWEB) March 28, 2013
Light Tool Supply, a family-owned business and an online superstore of industrial tooling and metalworking supplies announced that as of March 5, the company had officially completed its third year in business. Started in 2010 by Michael Elson, Light Tool Supply has wrapped up three successful years offering a wide array of industrial tooling supplies and metalworking tools online through its eCommerce website - LightToolSupply.com.
Light Tool Supply President, Michael Elson, said being able to sell industrial tooling machinery and precise measuring instruments online has helped the company stay profitable and expand its customer base. “Three years is a hallmark for any business,” Elson said. “Focusing on metalworking supplies and measuring tools by the top manufactures in the industry, enables Light Tool Supply to supply thousands of different products quickly and at the lowest costs. It has been a real factor in our ongoing business success,” Elson said.
Michael Elson brings more than 40 years of experience in the industrial tooling and metalworking supplies industry to his operation of Light Tool Supply. In addition to managing the day to day duties of the business, Elson serves as Vice President of Penn Tool Co., which is based in Maplewood, New Jersey. He fondly recalls growing up helping his father around the family’s tool shop.
“I started working in the metalworking supply business when I was pretty young,” he said. “For as long as I can remember, I have been surrounded by tools, whether it was packing orders and unloading trucks during the summer at my father’s tool supply company or working full time for him after graduating from college. This business is in my blood and I have a natural affinity for it.”
Elson keeps the focus of Light Tool Supply on streamlining ordering tooling and supplies so that the process is easy for customers and on offering an enormous amount of product at some of the lowest prices on the internet. His strategy allows Light Tool Supply to offer metalworking machinery by firms like Baileigh Industrial and precise measuring instruments by respected manufacturers like Mitutoyo. Elson stocks Light Tool Supply with inventory from hundreds of manufacturers and prides himself on being able to get any part for any customer at the lowest price possible. “If a customer sees something on our website that he does not feel is the best price, he should email me directly so that we can do our best to match the price.”
Elson invites customers to email his staff with a request for any part number from Light Tool Supply’s long list of vendors.

Share on TwitterShare on FacebookShare on Google+Share on LinkedInEmail a friend

Tuesday, March 26, 2013

#Digimatic Offset Centerline Calipers

http://www.digimaticcaliper.com/

Mitutoyo Offset Centerline Calipers - Series 573

Mitutoyo Offset Centerline Caliper
FEATURES
IP67
  • Specially designed for center to center distance measurements on the same and offset planes.
  • Can also measure from edge to center.
  • Hole diameter should be in the range of 1.5mm-10mm (.06"-.4").
  • With SPC data output. (series 573)
  • Supplied in fitted plastic case.
Technical Data

Accuracy: Refer to the list of specifications. (excluding quantizing error for digital models)
Resolution*: 0.01mm or .0005"/0.01mm
Graduation**: 0.05mm
Display*: LCD
Length standard*: ABSOLUTE electrostatic capacitance type linear encoder
Max. response speed*: Unlimited
Battery*: SR44 (1 pc.), 938882
Battery life*: Approx. 3.5 years under normal use
*Digital models **Analog models

Function of Digital Model

Origin-set, Zero-setting, Power On/Off, Data output, inch/mm conversion (inch/mm models) 
Alarm: Low voltage, Counting value composition error
Order No 573-705 573-706 573-708
Range .4-6in 10-150mm .4-8in 10-200mm .4-12in 10-300mm
Accuracy .0015in .0015in .0015in
Resolution .0005in 0.01mm .0005in 0.01mm .0005in 0.01mm
Mass 157g 177g 320g


#DigimaticCaliper

http://www.digimaticcaliper.com/ 

Digital / Electronic / Digimatic Calipers

Light Tool Supply has the lowest prices on Digimatic Calipers from the top manufactures. Our leading digital caliper brands are MitutoyoBrown & SharpeFowler,MahrStarrettTesa, and SPI. If you are looking for digital calipers, Light Tool Supply has the one you are looking for.
500-196
Mitutoyo ABSOLUTE Digimatic Caliper Series 500
500-752-t
Mitutoyo Absolute Coolant Proof Electronic Calipers
552-312-10
Mitutoyo Digimatic Carbon Fiber Caliper-Series 552
573-746
Mitutoyo ABSOLUTE Inside Caliper Series 573
573-281-20
Mitutoyo ABSOLUTE Snap Caliper Series 573
573-291
Mitutoyo ABSOLUTE Low Force Caliper Series 573
573-706
Mitutoyo Offset Centerline Caliper
573-661
Mitutoyo Tube Thickness Caliper
573-701
Mitutoyo Offset Jaw Digimatic Calipers
500-784
Mitutoyo Absolute Super Solar Caliper
573-721
Mitutoyo Point Calipers
 

Friday, March 22, 2013

Mahr Federal


Mahr


The Nuts And Bolts Of Thread Gaging
George Schuetz, Mahr Federal Inc.
 No pun intended, but thread gaging has always seemed a rather convoluted subject to me.  So, when I was questioned on the topic recently, I asked my friend, Lowell Johnson, a recognized authority and president of the Johnson Gage Company, to explain some of the basics and offer some tips on the process.  His advice:  Don’t trust Go/No Go thread gaging.  The reason is that this process is still widely used and, despite more than 40 years of evidence to the contrary, is so inaccurate that it will literally allow square screws to fit into round holes.  Lowell even demonstrated this in testimony before Congress.
 The simple fact of the matter is that tests that only demonstrate whether or not two parts will assemble show nothing about the quality or integrity of that assembly.  Just because they go together doesn’t mean they are going to stay together.  And, in the world of threaded fasteners and components, this can be a critical issue.  But why this is so, and why you should be using a system of instrumented dimensional gaging for screw threads, requires some explanation and an understanding of how threaded components function.
      
 Screw threads are so common we often take them for granted.  But in reality, they are geometrically rather complex, as you can see in Figure 1.  In addition to material and heat treatment, what gives a threaded joint its strength and integrity is the amount or percent of engagement along the flanks of the mating threads.  And because their geometry is so complex, lots of things can happen to limit this contact.  Changing the lead angle in either direction will change the pitch and result in mismatched threads.  A wobble, or “drunkenness” in the thread helix will limit contact, as will a change in diameter, roundness or taper.  Even a change in flank angle will yield a thread which assembles line, but has very little flank contact and almost/zero strength.  No matter how hard you try to tighten it, the nut will vibrate loose almost immediately.
 To understand the geometrical relationships involved and to allow process control, threads are commonly defined as having two diameters:  pitch and functional.  Functional diameter is a measure of fit, or the ability of the threaded product to be assembled.  This is the only dimension checked by Go/No Go gages.
 But as we noted, this may or may not reflect the real “dimensions” of the product, due to the nature of the helix, roundness, lead and taper.  Think of a set of gears whose teeth are meshed or butting.
 Pitch diameter, on the other hand, is a much more accurate reflection of size.  It is defined as “the diameter of an imaginary cylinder passing through the thread profile at such points as to make equal the width of the ridge and the width of the groove. “This number is significant for a couple of reasons.  One, the measured value for pitch diameter at any point along the axis of the screw thread reflects the actual amount of thread material.  This is called the Minimum Material Size.  Second, for design purposes, pitch diameter is the dimensional factor which governs the shear and tensile strength of the thread assembly.  It establishes the datum from which variations from perfect thread geometry can be referenced.


 This gets much more complicated than we have room to explain, but the important thing to remember is that in a perfect screw thread--and only in a perfect screw thread--the values for functional diameter and pitch diameter are equal.  In all other threads, differences in these two values reflect variations in taper, roundness, straightness, lead and thread angle, including helical path.  In short, they reflect a smaller percentage of flank area engagement, and hence, a reduction in the performance of the threaded assembly.  Likely problems include: galling during installation:  joint loosening (due to vibration): leakage: fatigue and relaxation: slip page: and ultimately, failure.          
 Bottom line, then, is that if you are going to accurately gage screw threads.  You need a dual instrument system that measures both functional and pitch diameters.  You need to know that both are within specified tolerances and you need to know the value of the difference between them, because it is this number which provides a basis for process control (see illustration).

Friday, March 15, 2013

Fowler Magbase & Indicator Set

Fowler X-LOCK Locking Arm Magbase & Indicator Set

Model 52-588-030

Fowler X-LOCK Locking Arm Magbase & Indicator Set

Locking-Arm Mag Base Features:

  • Accepts all AGD dial indicators and test indicators.
  • Length of arm 6"
  • Push button magnetic base.
  • The central locking mechanisim allows for easy set up of gages.
AGD Indicator Features:
  • 1" travel.
  • Continuous reading 0-100.
  • AGD group 2, 2-1/4" dial diameter.
  • Revolution counter.
  • Tolerance markers.
  • Lug back mount.
  • Carbide point.

#Fowler X-LOCK Locking Arm Magbase & Indicator Set

#WATERLOO Tool Boxes

WATERLOO Professional Heavy Duty Tool Storage 41" and 52" Wide

WATERLOO Professional Heavy Duty Tool Storage 41

WATERLOO Professional Heavy Duty Tool Storage 41" and 52" Wide

Features:

  • Built to handle the toughest environments, the Professional Series has all the features and durability to do the job while keeping tools securely stored.
  • Sturdy side-wall construction, ball-bearing slides, a patented latching system, and backed by a 7 year limited warranty.
  • The Professional Series features cabinets with full-width top drawers for long-tool storage, and chests with heavy- duty gas struts (select models).
  • Offered in high-quality red or black (41" and 52" widths).
  • A 41" stainless chest and cabinet combination completes the line.
  • Options in this series include 6" x 2" industrial-strength casters and non-slip drawer liners.
  • Caster Load Rating Over 3,200 lbs. Per Unit (Optional Casters)
  • 75 lb. Ball-Bearing Drawer Slides (Double Slides on Select Drawers)
  • Non-Slip Drawer Liners: Protect tools and keep them from sliding
Specifications:

#Dake Dura Press Single Phase - Hydraulic Presses

Dake Dura Press Single Phase - Hydraulic Presses

Dake Dura Press Single Phase - Hydraulic Presses


Dake Dura Press Single Phase - Hydraulic Presses

Features:
  • Electric power unit has convenient single phase, 110 volt operation for greater portability.
  • Sturdy, welded channel iron frame for durability.
  • Lever control ram advance for easy operation.
  • Quiet, low pressure hydraulic components for greater efficiency and smooth pressing.
  • Double acting cylinder allows for convenient positioning of ram.
  • One hand ram positioning with 4-way valve hydraulic control.
Specifications:
Model
number
capacity (tons)
horsepower
rpm
ram speed
A width between uprights
B width between table channels
C minimum ram to table
D maximum ram to table
E ram travel
JxK base
L height (inches)
weight (lbs)
Force 10DA
909205
10
1
3,450
20
20
4
4
40
10
29-3/4x24
80
300
Force 25DA
909215
25
1
3,450
10
28
7
8
44
10
30x38
88
570

Thursday, March 14, 2013

#STEVENS #Chain #Vise Clamp


STEVENS Chain Vise Clamp
Features:


  • STEVENS Chain Vise Clamp
  • Fast initial setup. Socket head cap screws are used for mounting each end of the chain clamp to a subplate or T-slotted table.
  • Each standard duty kit No.20149 (clamping force up to 6,000 lbs) and heavy duty kit No.20149HD (clamping force up to 12,000 lbs) includes a cam-locking hook assembly, a take-up unit for adjusting chain tension, and a chain set
  • The Modular fixture above utilizes two chain clamps to secure the valve body casting. A standard Allen wrench is used to operate the cam-locking hook assembly
  • Plastic shoes snap into chain to protect finished surfaces  
  • Since workpiece sizes vary, differing lengths of chain may need to be assembled. Our new Hitch Pins which replace spring clips allow quicker and easier assembly & disassembly of chain sets.

http://www.digimaticcaliper.com/

http://www.digimaticcaliper.com/


Digimatic Calipers

500-752A refinement now popular is the replacement of the analog dial with an electronic digital display on which the reading is displayed as a single value. Some digital calipers can be switched between centimeters or millimeters, and inches. All provide for zeroing the display at any point along the slide, allowing the same sort of differential measurements as with the dial caliper. Digital calipers may contain some sort of "reading hold" feature, allowing the reading of dimensions even in awkward locations where the display cannot be seen. Ordinary 6-in/150-mm digital calipers are made of stainless steel, have a rated accuracy of 0.001 in (0.02 mm) and resolution of 0.0005 in (0.01 mm). The same technology is used to make longer 8-in and 12-in calipers; the accuracy for bigger measurements declines to 0.001 in (0.03 mm) for 100–200 mm and 0.0015 in (0.04 mm) for 200–300 mm.
Many Chinese-made digital calipers are inexpensive and perform reasonably well. One point worth noting is battery current when they are turned off. Many calipers do not stop drawing power when the switch is in the off position; they shut down the display but continue drawing nearly as much current. The current may be as much as 20 microamperes, which is much higher than many established brands. Sometimes calipers may not work properly when the battery voltage has dropped relatively little; silver cells, preferably selected from a datasheet to have a constant voltage for most of their life, may give a much longer usable life than alkaline button cells (e.g., SR44 instead of LR44).
Increasingly, digital calipers offer a serial data output to allow them to be interfaced with a dedicated recorder or a personal computer. The digital interface significantly decreases the time to make and record a series of measurements, and it also improves the reliability of the records. A suitable device to convert the serial data output to common computer interfaces such as RS-232, Universal Serial Bus, or wireless can be built or purchased. With such a converter, measurements can be directly entered into a spreadsheet, a statistical process control program, or similar software.
The serial digital output varies among manufacturers. Common options are
Like dial calipers, the slide of a digital caliper can usually be locked using a lever or thumb-screw.
Some digital calipers contain a capacitive linear encoder. A pattern of bars is etched directly on the printed circuit board in the slider. Under the scale of the caliper another printed circuit board also contains an etched pattern of lines. The combination of these printed circuit boards forms two variable capacitors. The two capacitances are out of phase. As the slider moves the capacitance changes in a linear fashion and in a repeating pattern. The circuitry built into the slider counts the bars as the slider moves and does a linear interpolation based on the magnitudes of the capacitors to find the precise position of the slider. Other digital calipers contain an inductive linear encoder, which allows robust performance in the presence of contamination such as coolants. Magnetic linear encoders are used in yet other digital calipers.
http://www.digimaticcaliper.com/

Wednesday, March 13, 2013

#Roscamat Tap Adapters


    Roscamat Tap Adapters

Roscamat Tap Adapters
Tap adapters for Roscamat Tapping Arm-Pneumatic Machines Numbers 200-350 & 200-750


#SPI Hole #Micrometers

#SPI Hole #Micrometers
 SPI Hole Micrometers Electronic 3 Point Internal


#13-541-8          SPI Hole Micrometers Electronic 3 Point Internal
.275"-.350"
#13-542-6 SPI Hole Micrometers Electronic 3 Point Internal
.350"-.425"
#13-543-4 SPI Hole Micrometers Electronic 3 Point Internal
.425"-.500"
#13-544-2 SPI Hole Micrometers Electronic 3 Point Internal
.500"-.650"
#13-545-9 SPI Hole Micrometers Electronic 3 Point Internal
.650"-.800"
#13-546-7 SPI Hole Micrometers Electronic 3 Point Internal
.800"-1.000"
#13-547-5 SPI Hole Micrometers Electronic 3 Point Internal
1.000"-1.200"
#13-548-3 SPI Hole Micrometers Electronic 3 Point Internal
1.200"-1.600"
#13-549-1 SPI Hole Micrometers Electronic 3 Point Internal
1.600"-2.000"
#13-550-9 SPI Hole Micrometers Electronic 3 Point Internal
2.000"-2.500"
#13-551-7 SPI Hole Micrometers Electronic 3 Point Internal
2.500"-3.000"
#13-552-5 SPI Hole Micrometers Electronic 3 Point Internal
3.000"-3.500"
#13-553-3 SPI Hole Micrometers Electronic 3 Point Internal
3.500"-4.000"
#13-555-8 SPI Hole Micrometers Electronic 3 Point Internal 3 .275"-.500"
#13-556-6 SPI Hole Micrometers Electronic 3 Point Internal 2 .500"-.800"
#13-557-4 SPI Hole Micrometers Electronic 3 Point Internal 4 .800"-2.00"
#13-558-2 SPI Hole Micrometers Electronic 3 Point Internal 4 2.00"-4.00"

Tuesday, March 12, 2013

#SPI Hole #Micrometers

SPI Hole Micrometers Electronic 3 Point Internal

SPI Hole Micrometers Electronic 3 Point Internal 

  • Self-centering 3 point measurement for more accuracy.
  • IP54 protection.
  • Carbide tipped contact points
  • Supplied with setting rings and 6" extension.
  • SPC port outlet.
  • Resolution: 0.00005"
  • Accuracy: ±0.0001"
  •  

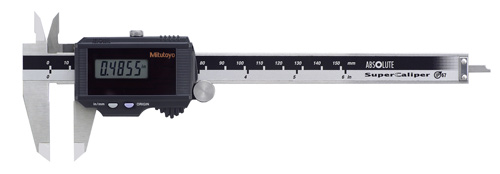
    #Mitutoyo Absolute #Super #Solar #Caliper


    http://www.mitutoyo.com/Images/002/285/500-784.jpg


    Super Caliper-Solar Powered- Series 500-No battery or origin reset needed for IP67 Digital Caliper

    Series 500
    Features
    • With no annoying origin restoration necessary,a measurement can be started any time and there is no restriction on operating speed.
    • World’s unique* solar-powered SuperCaliper that is eco-friendly with no battery. *According to Mitutoyo investigation in January, 2005
    • The impact resistance of the display unit has been increased for improved usability in workshop conditions.
    • IP67 protection assures waterproof reliability.
    • This SuperCaliper uses components that do not contain harmful substances and is compatible with RoHS Directives.
    • Supplied in fitted plastic case.
    Technical Data

    Accuracy: Refer to the list of specifications
    Resolution: 0.01mm or .0005"/0.01mm
    Repeatability: 0.01mm / .0005”
    Display: LCD
    Length standard: ABSOLUTE electromagnetic induction linear
    encoder Max. response speed: Unlimited
    Battery: Solar battery*
    Dust/Water protection level: IP67
    *Can be used continuously above 60 lux ambient illumination.
    Function
    Origin-set, inch/mm conversion (inch/mm models)
    Alarm: Counting value composition error
    Optional Accessories
    05CZA624: SPC cable with data switch (1m / 40”)
    05CZA625: SPC cable with data switch (2m / 80”)
    IP67 protection level
    Level 6: Dust-tight
    No ingress of dust.
    Level 7: Protected against the effects of temporary
    immersion in water.
    Ingress of water in quantities causing harmful
    effects shall not be possible when the enclosure
    is temporarily immersed 1 meter in water under
    standardized conditions of pressure and time
    (30 min.).
    About the charge function (Super Caliper)
    The minimum illumination required in the uncharged state is
    60 lux. As shown in the table ‘JIS Z 9110 Artificial Illumination
    Intensity Standard’, this Super Caliper can be used
    without problems in a normal work environment.
    The charge function allows the operator to use this
    Super Caliper without interrupting work even if the ambient illumination is temporarily insufficient.
    In the fully charged state this SuperCaliper can operate
    for approximately an hour in an environment of 50lux
    illumination (less than the minimum necessary illumination
    intensity).
    The time necessary for full charge differs, depending on
    the charging conditions. If this Super Caliper is left unused
    in an illumination of 500 lux (usual for manufacturing
    environments), it takes approximately one hour to
    reach full charge.