Gaging Those "Oddball" Applications
http://www.mahrfederal.com/
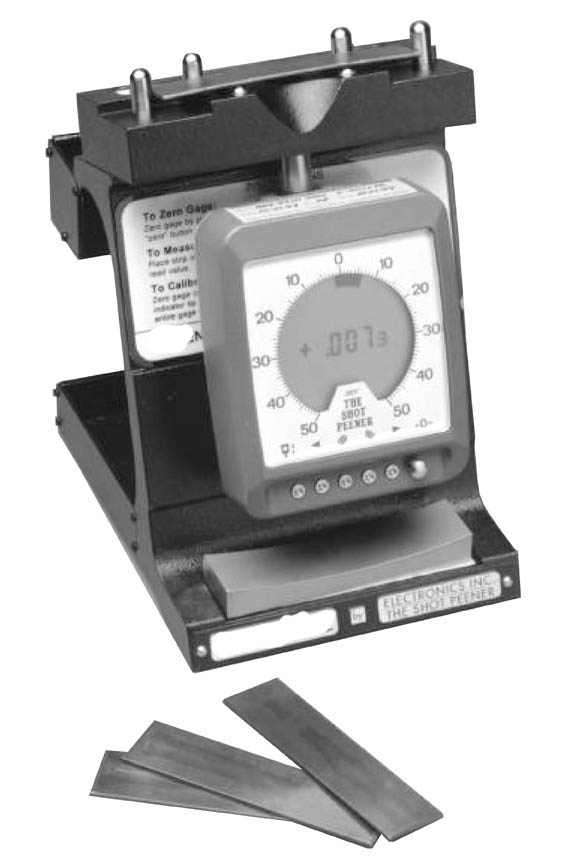
GAGING THE "ODDBALL" APPLICATION Virtually all metalworking shops need to measure holes, thicknesses, and heights. Some shops, however, have to perform measurements that are more limited in application: some are industry or even company specific.George Schuetz, Mahr Federal Inc. Oftentimes, manufacturers attempt to satisfy unusual gaging applications by designing and fabricating a gage in-house. Most of the concepts of gage design are straightforward, and clever machinists can figure out how to apply these concepts in fairly basic fashion, usually by incorporating stock components such as indicators and gage heads, into custom-made fixtures. Amateur gage design, however, may not be efficient. It's often more cost effective to let gaging experts work out the details and spread design costs over a larger number of users. Following are examples of gages developed for specialized applications. There are two points to be made here: the first is that even the most obscure measurement tasks can usually be performed by relatively simple gages. The second is that many gage makers are more than willing to work on "oddball" applications, freeing gage users to concentrate on their real business. There are hundreds of thousands of countersunk rivet holes in the skin of a typical airliner. To achieve maximum holding power and minimum wind resistance, the head of every rivet must sit flush with the outer surface of the skin. However, government standards strictly limit the degree to which a manufacturer can grind down proud-standing rivet heads. As countersink bits wear, countersink diameters and depths change. Riveters need to measure the countersinks, in order to pick the right size rivet from an available selection range. Countersink gages, operate like hand-held, plunger-type depth gages, with special-ratio dials or electronics, to convert vertical movement at the contact into diametric measurements. The gage contact must be chosen to correspond with the included angle of the countersink. Some gages measure the major, or entry diameter, while others measure the depth of the minor diameter (where the countersink meets the straight hole). Although aerospace is currently the predominant application, other high-precision sheet metal industries have applications. More exotic is a gage which is used to measure and control the results of the shot peening process. Shot peening bombards a part with a stream of steel or glass particles, inducing sub-surface material compression and greatly reducing stress cracking under tensile loads. Shot peening is widely used on automotive and compressor crankshafts and conrods. To measure the process, a thin metal test strip is subjected to the shot stream. The strip bends in a predictable manner, as a function of shot stream intensity. An shot peen gage measures the radius of the strip. Gage manufacturers have developed innovative mastering strategies to take both the longitudinal and transverse curvatures of the strip into account, and use refined mechanisms and geometries to hold and measure the strip without distortion. Although the shot peen gage is essentially a bench top depth gage, it's these important details that make the gaging process quick and cost effective. Aerosol and beverage can manufacturers have highly specialized gaging requirements. Tight tolerances must be maintained, both in order to ensure proper functioning of valves, seals, and pop-tops, and to save material: at production rates of several million units per day, a wall thickness variation of a few millionths quickly adds up to tons of aluminum. There are more than a dozen critical dimensions on most cans, including such arcane features as crimp groove location, valve stem height, and "tab top bubble height." In order for SPC to be effective when manufacturing cans the gaging results must work their way back to the manufacturing process in a timely manner as the cans go whizzing by. Whole catalogs of can gages have been developed. At the lower end of the technology spectrum are specialized indicator gages, which differ from generic gages mainly in the shapes of their reference surfaces and sensitive contacts. Once again, the dimensions being measured here are simply variations on the basic themes of height, depth, thickness, ID, and OD. But the theme can be elaborated almost infinitely, depending upon the need for precision, throughput, and electronic output. Engineered fixture gages incorporating air jets and/or electronic gage heads can get the manufacturer halfway there, while fully automated systems with parts handling capabilities can ultimately make can gaging a hands-off, closed-loop process. If the only concern is accuracy, then gage design can be pretty simple: laboratories achieve extremely good results with a dial indicator and a comparator stand. Production applications, however, impose additional demands of throughput, ease of use, delivery, and maintenance and mastering intervals. When it comes to cost effectiveness in specialized applications, it's the details that make the difference. |

No comments:
Post a Comment